Active
UNDELETE

DCOM Configuration

Windows7 logo   Intel logo

Active@ UNDELETE Ver 2.0
See documentation for latest version

DCOM Configuration

Contents

Introduction

The Component Object Model (COM) can make distributed applications secure without any security-specific coding or design in either the client or the component. Just as the COM programming model hides a component's location, it also hides the security requirements of a component. The same binary code that works in a single-machine environment, in which security may be of no concern, can be used securely in a distributed environment.

To configure DCOM you can use registry editor or OLE View utility to edit registry settings directly, or DCOMCNFG configuration utility to edit them in graphical user interface.

DCOMCNFG configuration utility

DCOMCNFG is a utility you can use to configure various COM-specific settings in the registry. This configuration utility, dcomcnfg.exe, is included in the Microsoft Windows NT® operating system and is used to configure applications to use COM. If you do not have it installed, you can download and install it from Microsoft Web Site. The dcomcnfg.exe utility is not added to the Start menu or any groups during installation of Windows. An administrator must start it from the Run command on the Start menu.

DCOMCONFG must be used to configure an application's COM properties before the application can use COM to communicate over the network. The DCOMCONFG utility can be used to:

  • Disable distributed components for an entire computer or for a specific application. By default, distributed components are enabled.
  • Configure the location of an application.
  • Set permissions on server applications, either for all applications or for individual applications.
  • Configure the user account that will be used to execute the server application. The client application uses this account to start processes and gain access to resources on the server computer.
  • Configure the level of security for connections between applications, for example, using packet encryption.

Both the computers that are running the client and the server applications must be configured for a distributed environment with the DCOMCONFG utility:

  • Client Application. On the computer that will be running the client application, the administrator must specify the location of the server application. When a COM client application is used, it makes a request to a server application, which could be running on a different computer.
  • Server Application. On the computer that will be running the server application, the administrator must specify the user accounts that will have permission to use or start the server application. In addition, it is necessary to specify the user accounts that will be used to run the server application.

When DCOMCNFG starts, it displays the Distributed COM Configuration Properties dialog box. This dialog box has three tabs: Default Security, Default Properties, and Applications.

Default Security

You can use the Default Security tab to specify default permissions for objects on the system. This tab has three sections: Access, Launch, and Configuration. To change a section's defaults, click the corresponding Edit Default button. These default security settings are stored in the registry under HKEY_LOCAL_MACHINE\Software\Microsoft\OLE.
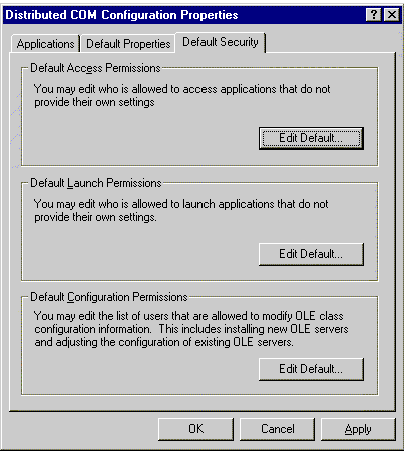
The Default Security tab

Default Properties

On the Default Properties tab, you must select the Enable Distributed COM on This Computer check box if you want clients on other machines to access COM objects running on this machine. Selecting this option sets the HKEY_LOCAL_MACHINE\Software\Microsoft\OLE\EnableDCOM value to Y.
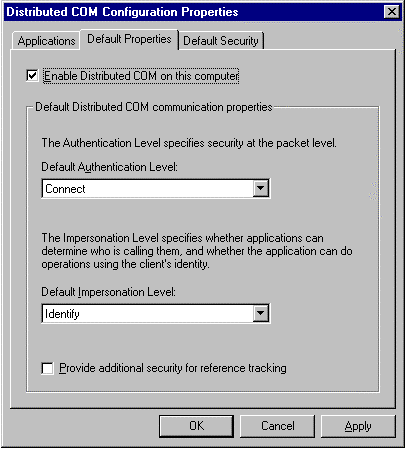
The Default Properties tab

Applications

You can change the settings for a particular object from the Applications tab. To do so, you select the application from the list and click the Properties button. This action displays the Object Properties dialog box for the selected application.
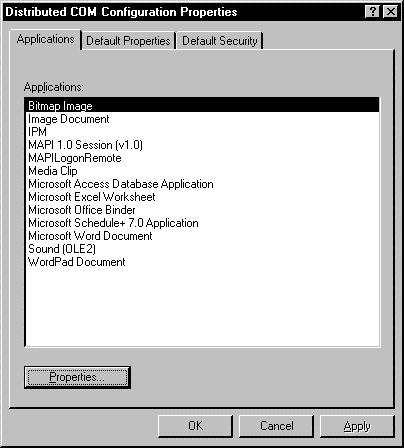
The Applications tab

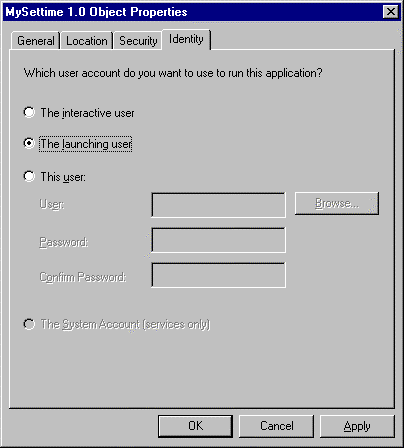
The Object Properties dialog box has four tabs:
  • The General tab confirms the application you are working with.
  • The Location tab specifies where the application should run when a client creates the instance of server application. If you select the Run Application on the Following Computer check box and enter a computer name, a RemoteServerName value is added under the APPID for that application. 
  • The Security tab is similar to the Default Security tab found in the Distributed COM Configuration Properties dialog box, except that these settings apply only to the current application. Again, the settings are stored under the APPID for that object.
  • The Identity tab identifies which user is used to run the application.
The Object Properties dialog box

Setting Machine-Wide Security Using DCOMCNFG

When you want all of the applications on one computer that do not provide their own security to share the same default security settings, you would set security on a machine-wide basis. Using Dcomcnfg.exe makes it easy to set default values in the registry that apply to all applications on a machine.

It is important to understand that if the client or server explicitly sets processwide security, the default settings in the registry will be ignored. Also, if you use Dcomcnfg.exe to specify security settings for a particular process, the default machine settings are overridden by the settings for the process.

When enabling machine-wide security, you must set the authentication level to a value other than None and you must set launch and access permissions. You have the option of setting the default impersonation level, and you also can enable reference tracking. The following topics in this section provide step-by-step procedures:

Setting Machine-Wide Default Authentication Level

The authentication level is used to tell COM at what level you want the client to be authenticated. These levels offer various levels of protection, from no protection to full encryption. To enable security for a machine, you need to choose an authentication level other than None. You can choose such a setting, using Dcomcnfg.exe, by completing the following steps.

To set the authentication level on a machine-wide basis:

  1. Run Dcomcnfg.exe.
  2. Choose the DefaultProperties tab.
  3. From the DefaultAuthenticationLevel list box, choose a value other than (None).
  4. If you will be setting more properties for the machine, click the Apply button to apply the new authentication level. Otherwise, click OK to apply the changes and exit Dcomcnfg.exe.

Setting Machine-Wide Launch Permissions

The launch permissions you set with Dcomcnfg.exe determine a list of users, each of which is explicitly granted or denied permission to launch any server that does not provide its own launch-permission settings. When setting launch permissions, you can add or remove one or more users or groups from this list. For each user that you add, you must specify whether the user is being granted or denied launch permission.

To set launch permissions for a machine:

  1. On the Default Security property page in Dcomcnfg.exe, choose the Edit Default button in the Default Launch Permissions area.
  2. To remove users or groups, select the user or group you want to remove and choose the Remove button. The selected user or group will no longer appear in the list box. When you have finished removing users and groups, choose OK.
  3. If you want to add a user or group, choose the Add button.
  4. If you know the fully qualified user name you want to add, type it in the Add Names text box. If you do not know the user name, you can browse the user database to find it. When you have located the user name, select the user or group from the Names list box and choose the Add button.
  5. From the Type of Access list box, select the access type (either Allow Launch or Deny Launch). To add other users that will also have the selected type of access, repeat step 4. When you have finished adding users for the selected access type, choose the OK button.
  6. To add users that will have a different type of access, repeat steps 4 and 5. Otherwise, choose OK to apply the changes.

Setting Machine-Wide Access Permissions

Dcomcnfg.exe allows you to set access permissions to control the list of users who are granted or denied access to the methods of those servers that do not provide their own access permissions. You can add users or groups to the list, specifying whether access permission is being granted or denied. You can also remove users from the list.

When setting access permissions, you must ensure that SYSTEM is included in the list of users that are granted access. If you have granted access permissions to Everyone, SYSTEM is included implicitly.

The process of setting access permissions for a machine is similar to setting launch permissions. The following steps should be taken.

To set access permissions for a machine:

  1. On the Default Security property page in Dcomcnfg.exe, choose the Edit Default button in the Default Access Permissions area.
  2. To remove users or groups, select the user or group you want to remove and choose the Remove button. The selected user or group will no longer appear in the list box. When you have finished removing user and groups, choose OK.
  3. If you want to add a user or a group, choose the Add button.
  4. If you know the fully qualified user name you want to add, type it in the Add Names text box. If you do not know the user name, you can browse the user database to find it. When you have located the user name, select the user or group from the Names list box and choose the Add button.
  5. From the Type of Access list box, select the access type (either Allow Access or Deny Access). To add other users that will have the selected type of access, repeat step 4. When you have finished adding users for the selected access type, choose the OK button.
  6. To add users that will have a different type of access, repeat steps 4 and 5. Otherwise, choose OK to apply the changes.

Setting Machine-Wide Impersonation Level

The impersonation level, set by the client, determines the amount of authority given to the server to act on the client's behalf. For example, when the client has set its impersonation level to delegate, the server can access local and remote resources as the client, and the server can cloak over multiple machine boundaries if the cloaking capability is set.

To set the impersonation level for a machine:

  1. With Dcomcnfg.exe running, choose the Default Properties tab.
  2. From the Default Impersonation Level list box, choose the impersonation level you want.
  3. If you will be setting more properties for the machine, choose the Apply button to apply the new impersonation level. Otherwise, choose OK to apply the changes and exit Dcomcnfg.exe.

Setting Machine-Wide Reference Tracking

When you enable reference tracking, you are asking COM to do additional security checks and to keep track of information that will keep objects from being released too early. Keep in mind that these additional checks are expensive. Use the following steps to enable or disable reference tracking.

To set reference tracking for a machine:

  1. With Dcomcnfg.exe running, choose the Default Properties tab.
  2. To enable (or disable) reference tracking, select (or clear) the Provide additional security for reference tracking check box near the bottom of the page.
  3. If you will be setting more properties for the machine, choose the Apply button to apply the new setting. Otherwise, choose OK to apply the changes and exit Dcomcnfg.exe.

Enabling and Disabling DCOM

When a computer is part of a network, the DCOM wire protocol enables COM objects on that computer to communicate with COM objects on other computers. You can disable DCOM for a particular computer, but doing so will disable all communication between objects on that computer and objects on other computers.

Disabling DCOM on a computer has no effect on local COM objects. COM still looks for launch permissions that you have specified. If no launch permissions have been specified, default launch permissions are used. Even if you disable DCOM, if a user has physical access to the computer, they could launch a server on the computer unless you set launch permissions not to allow it.

WarningIf you disable DCOM on a remote computer, you will not be able to remotely access that computer afterwards to re-enable DCOM. To re-enable DCOM, you will need physical access to that computer.

To manually enable (or disable) DCOM for a computer:

  1. Run Dcomcnfg.exe.
  2. Choose the DefaultProperties tab.
  3. Select (or clear) the Enable Distributed COMon this Computer check box.
  4. If you will be setting more properties for the machine, click the Apply button to enable (or disable) DCOM. Otherwise, click OK to apply the changes and exit Dcomcnfg.exe.

Setting Process-wide Security Using DCOMCNFG

You might want to enable security for a particular application if an application has security needs that are different from those required by other applications on the machine. For instance, you might decide to use machine-wide settings for your applications that require a low level of security while setting a higher level of security for a particular application.

However, security settings in the registry that apply to a particular application are sometimes not used. For example, the application-wide settings that you set in the registry using Dcomcnfg.exe will be overridden if a client sets security explicitly for a particular interface proxy.

When enabling security for an application, several settings may need to be modified. These include authentication level, location, launch permissions, access permissions, and identity. For step-by-step procedures, see the following topics in this section:

Setting the Authentication Level for an Application

To enable security for an application, you must set an authentication level other than None. The authentication level tells COM how much authentication protection is required, and it can range from authenticating the client at the first method call to encrypting parameter states fully.

To set an application's authentication level:

  1. On the Applications property page in Dcomcnfg.exe, select the application and click the Properties button (or double-click the selected application).
  2. On the General page, select an authentication level other than (None) from the Authentication Level list box.
  3. If you will be setting other properties for this application, choose the Apply button to apply the new authentication level. Click OK if you are finished setting properties for this application and you wish to apply the changes.

Setting the Location for an Application

The location you set for your application determines the computer on which the application will run. You can choose to run your application on the machine where the data is located, on the machine you use to set the location, or on a specified machine.

To set an application's location:

  1. With Dcomcnfg.exe running, select the application from the Applications page and choose the Properties button (or double-click the selected application).
  2. On the Location page, select one or more check boxes that correspond to locations where you want the application to run. If you select more than one check box, COM uses the first one that applies. If Dcomcnfg.exe is being run on the server machine, always select Run Application On This Computer.
  3. If you will be setting other properties for this application, choose the Apply button to apply the new location. Choose OK if you are finished setting properties for this application and you wish to apply the changes.

Setting Launch Permissions for an Application

With Dcomcnfg.exe, you can set launch permissions to control the list of users who are granted or denied permission to launch a particular server. You can add users or groups to the list, specifying whether access permission is being granted or denied. You can also remove users from the list.

To set launch permissions for an application:

  1. With Dcomcnfg.exe running, select the application from the Applications page and choose the Properties button (or double-click the selected application).
  2. On the Security property page, select the Use custom launch permissions option button and choose the Edit button in the same area.
  3. To remove users or groups, select the user or group you want to remove and choose the Remove button. The selected user or group will no longer appear in the list box. When you have finished removing user and groups, choose OK.
  4. If you want to add users or groups, choose the Add button.
  5. If you know the fully qualified user name you want to add, type it in the Add Names text box. If you do not know the user name, you can browse the user database to find it. When you have located the user name, select the user or group from the Names list box and choose the Add button.
  6. From the Type of Access list box, select the access type (either Allow Launch or Deny Launch). To add other users that will have the selected type of access, repeat step 5. When you have finished adding users for the selected access type, choose the OK button.
  7. To add users that will have a different type of access, repeat steps 5 and 6. Otherwise, choose OK to apply the changes.

Setting Access Permissions for an Application

With Dcomcnfg.exe, you can control the list of users who are granted or denied access to the methods of a particular server by setting access permissions. You can add users or groups to the list, specifying whether access permission is being granted or denied. You can also remove users from the list.

When setting access permissions, you must ensure that SYSTEM is included in the list of users that are granted access. If you have granted access permissions to Everyone, SYSTEM is included implicitly.

The process of setting access permissions for an application is similar to setting launch permissions. The steps are as follows.

To set access permissions for an application:

  1. With Dcomcnfg.exe running, select the application from the Applications page and choose the Properties button (or double-click the selected application).
  2. On the Security property page, select the Use custom access permissions option button and choose the Edit button in the same area.
  3. To remove users or groups, select the user or group you want to remove and choose the Remove button. The selected user or group will no longer appear in the list box. When you have finished removing user and groups, choose OK.
  4. If you want to add a user or a group, choose the Add button.
  5. If you know the fully qualified user name you want to add, type it in the Add Names text box. If you do not know the user name, you can browse the user database to find it. When you have located the user name, select the user or group from the Names list box and choose the Add button.
  6. From the Type of Access list box, select the access type (either Allow Access or Deny Access). To add other users that will have the selected type of access, repeat step 5. When you have finished adding users for the selected access type, choose the OK button.
  7. To add users that will have a different type of access, repeat steps 5 and 6. Otherwise, choose OK to apply the changes.

Setting the Identity for an Application

An application's identity is the account that is used to run the application. The identity can be that of the user that is currently logged on (the interactive user), the user account of the client process that launched the server, a specified user, or a service. You can use Dcomcnfg.exe to choose one of these identities for the application.

To set identity for an application:

  1. With Dcomcnfg.exe running, select the application from the Applications page and choose the Properties button (or double-click the selected application).
  2. On the Identity property page, select the option button for the identity you want. If you choose the This User: option, you must type in the user name, the password, and the confirmed password.
  3. If you will be setting other properties for this application, choose the Apply button to apply the new identity. Choose OK if you are finished setting properties for this application and you wish to apply the changes.

Browsing the User Database

You would browse the user database in Dcomcnfg.exe when you need to find the fully qualified user name for a particular user. For instance, you can browse the user database to locate a user that you want to add for access or launch permissions.

To browse the user database:

  1. In the List Names From list box, select the domain containing the user or group you want to add.
  2. To see the users that belong to the selected domain, choose the Show Users button.
  3. To see the members of a particular group, select the group in the Names list box and choose the Show Members button.
  4. If you cannot locate the user or group you want to add, choose the Search button, which brings up the Find Account dialog box. Select the domain you want to search (or select Search All), type the user name you want to look for, and choose the Search button.

Windows 95 and Windows 98 issues. Security

If you have a network of machines running Microsoft® Windows® 95 or Microsoft Windows 98, it is important to know whether there is a Microsoft Windows NT® or Microsoft Windows 2000 domain in the network. If there is a Windows NT or Windows 2000 domain, both Windows 95 and Windows 98 can provide authentication and authorization using a pass-through security mechanism. However, if there is no Windows NT or Windows 2000 domain in the network, only unsecure calls can be made.

Because the default behavior of COM is to try to make a secure call and then default to an unsecure call, you need to change COM's default behavior before a COM client can successfully call a COM server over a Windows 95 and Windows 98-only network. To change this behavior, the following tasks must be completed:

  • Both the client and server must set the authentication level for call security to be NONE.
  • On activation, the client must specify an authentication level of NONE.
  • Reference tracking must be disabled.

Windows 95/98 COM Servers

When a Windows 95/98 COM server is used to serve objects to remote clients, make sure to:

  1. Verify that the EnableDCOM and EnableRemoteConnections registry keys under HKLM\Software\Microsoft\OLE are set to Y on the server machine. EnableDCOM must be set to Y to enable any distributed COM functionality. EnableRemoteConnections must be set to Y to let the machine act as a server.
  2. On a Windows 95 computer, manually start the server. Windows 95 does not support launching servers through COM.

Windows 95/98 client and Windows NT Server

The authentication level is negotiated as follows: If you have a Windows 95/98 client with authentication level Connect and a Windows NT server object with authentication level Encrypt, COM will try to use Encrypt for calls in both directions. Since Windows 95/98 cannot receive calls at Encrypt, the Windows NT computer cannot call the Windows 95/98 machine. Thus both the client and server have to set the authentication level to the lowest value allowable for any call in any direction.

Similarly, if you have two processes, one with a logon token and the other with an impersonation token, and you set the authentication level to none in the second, it still won't be able to call the first if its authentication level is not none.

Data Recovery

Data Utility

Data Security

Data Backup

CD/DVD Tools