Active@ UNDELETE is an advanced data recovery tool designed to recover data lost or deleted data, or even information from formatted hard disks.
A physical device is an installed hard disk, Flash card, external USB disk or any device that holds data. It can be scanned in order to detect deleted (damaged) partitions or files by their signatures at the same time. Detected partition can be scanned as any other logical drive for files and folders. You can scan detected partition to verify partition content before partition restoration or to be able to recover (copy) files to safe location if partition was deleted or damaged.
From Recovery explorer:
Define scan range and other scan attributes if necessary.
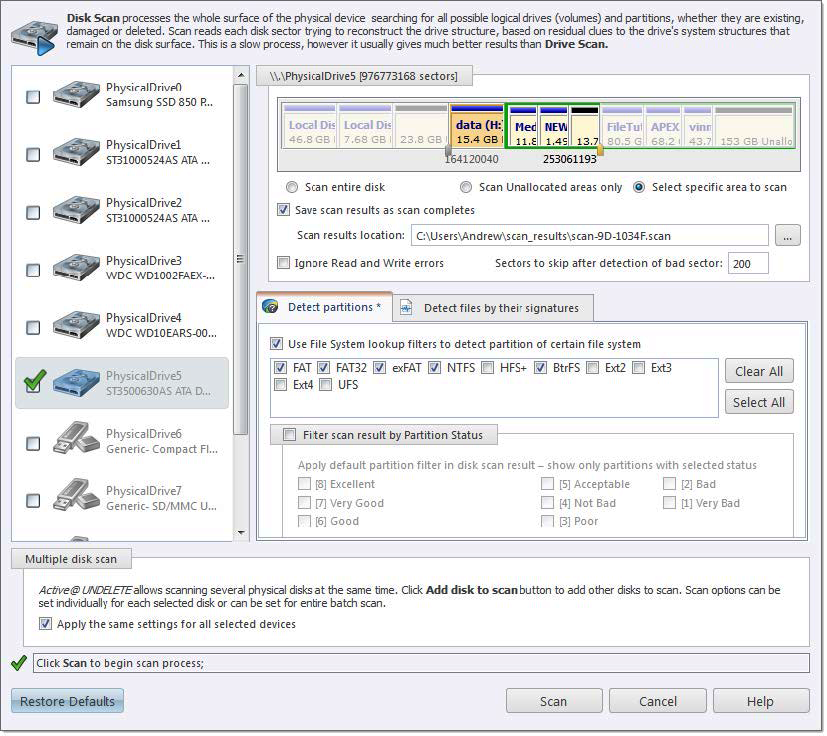
Figure 8: Disk Scan dialog
Select scan area using predefined options: entire disk, unallocated only or specific range - use arrow markers to mark scan area
Note: Scan area markers shown first and last sectors of scanning area. To enter exact start and end sectors to scan click on sector label and enter exact value in text field
Enter path, where scan results will be saved as soon as scan completed
Ignore disk Read/Write Errors
Amount of sectors to skip in case of read errors. Use this attribute to avoid scan prolonging on massive bad sectors arrays
Select desired File System of a partitions to be detected
Select this option to specify exact file types to be detected during the scan. With this option, device scan reads each disk sector trying to reconstruct any possible data related to unique file format.
Important: Turn this option off when you only want to detect and restore partition - it will significantly save your scanning time.
Define scan results refining filter by partition integrity status.
Additional disks can be selected to scan on the Physical disks list to be scanned simultaneously. At least one disk must be selected.
All scan options above, can be selected for each drive individually or, when this check box is selected, to be the same for all selected logical drives.
Click Scan to initiate scan of selected disks.
During the scan:
After the scan completes you will see scan results in the Work with device scan results.
A Logical Drive scan result appears in the Device scan result view where results can be reviewed and files selected for recovery.
Note: We recommend saving scan results to a designated location for later use - you can use saved scan results to save time on repeated scanning of the same volume.