The Disk Editor allows you to edit the content of a selected part of an opened object. By default, the Disk Editor shows the content of an object in a Read Only mode that prevents accidental modifications. In Edit mode, you can change the content of the opened file or disk and all modifications are stored in memory. Changes are written to the drive when you click Save.
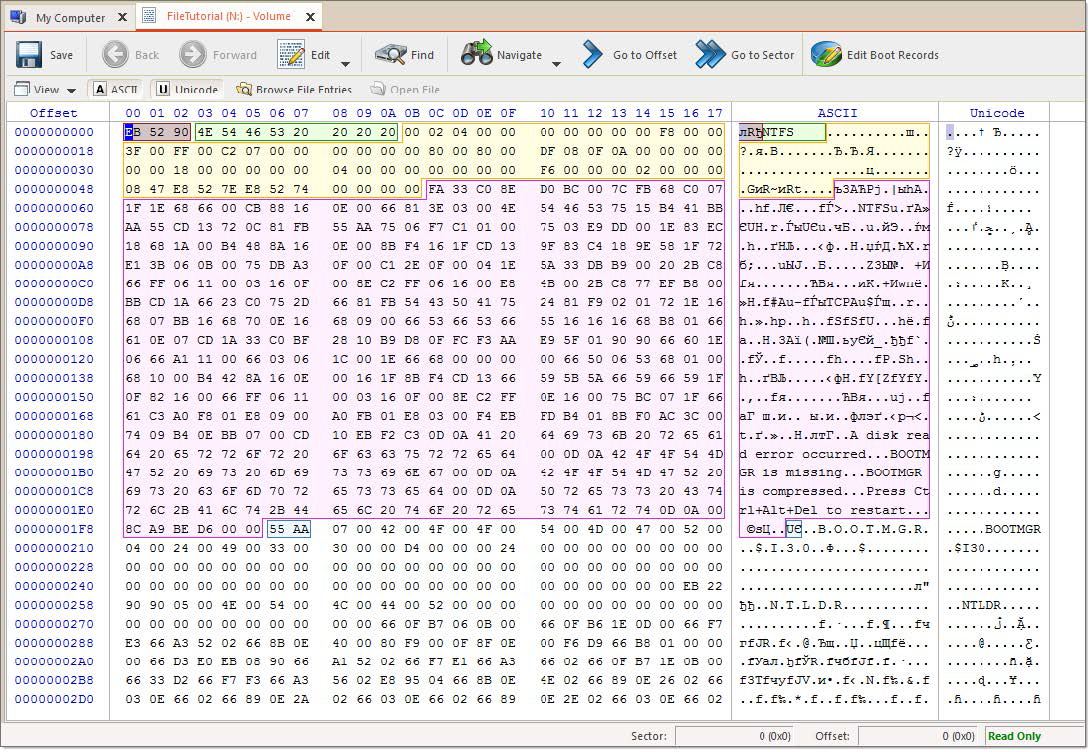
Figure 36: Disk Editor tab — editing volume example
To toggle between Read Only and Edit modes, do one of the following:
When you copy selected text from the edit pane to the clipboard, you may store it there in one of two formats using the following commands:
After you have opened an object with the Disk Editor, you may navigate by scrolling block by block, or by jumping directly to specific addresses. You may jump to disk system records such as the boot sector (primary and copy) or a partition table.
In order to select data in the Disk Editor Area, click and hold down the left mouse button and start dragging to select area. The selected area background will be highlighted. Release the mouse to finish selecting. You can select an area bigger than will fit into the screen by dragging the mouse beyond the top or bottom edge of the hex editor window.
The alternative way to make a selection is to define a beginning and an end of the block. This method might be more convenient when a large area has to be selected in order to simply select data in a particular range. Move the cursor to the position where you want the selection to start and do one of the following:
Move the cursor to the end of the desired selection and set the end of a selection in a similar way. If you need to select all the data, you can use the Select All command instead.
To apply massive changes to selection (block) use Filling a selection feature.
Select an area of data as described above and either select the command Edit > Copy or press Ctrl+C. The selected area will be copied into the clipboard in binary format. If you later want to insert it into a text editor, use the Copy Formatted command instead. It will copy data as a formatted text.
When you copy selected text from the edit pane to the clipboard, you may store it there in one of three formats:
Note: Please note that you can copy a maximum of 1MB of data into the clipboard.
If you copied data into the clipboard, you can paste it into a different place by moving the cursor to the position where you want the data to be copied. Use the command Edit > Paste or press Ctrl+V.
If you copied a text into the clipboard in a text editor, it will be pasted into the Disk Editor as text. Otherwise, the data will be copied as binaries.
Unless stated otherwise, all modifications made in the Hex Editor are stored in memory. Changes are written to the drive when you click Save.
To navigate to the disk system records of a physical disk, click on the Navigate button in the toolbar. Depending on the partition scheme and contents of the physical disk you are editing, the Navigate menu will contain different options.
After the Go to Offset and Go to Sector items there is a Partition Table menu item which allows jumping to sector 0 of a physical disk. As you jump to the partition table, a Master Boot Record template is automatically selected. If the disk is not empty, the names of the partitions and their system areas will be in sub menus below the Partition Table menu item.
For dynamic disks the following system areas are available for direct access:
After each access point a sector number is specified in the brackets.
To navigate to the disk system records of a logical drive, click on the Navigate button in the toolbar. Depending on the file system present in a logical drive, the navigation menu will have different access points.
Some of the access points when used automatically select a corresponding template. For example, if a boot sector access point is selected, a boot sector template is applied to the boot sector offset.
When editing volume (logical drive) you also can navigate file records. To activate this feature toggle on Browse File Entries button in toolbar. By selecting file or folder in file's tree editor's pane will automatically repositions to beginning of file entry record. If recognised, file can be previewed in File Preview pane and Property pane will display file's most common attributes and properties.

Figure 37: Browsing volume file entries
To open selected file in separate Disk Editor either click Open File button in toolbar or Double click on selected file for the same result.
To open file in Disk Editor use:
To open file in Disk Editor select it Scan Result view or Search Result view and click Open in Disk Editor button to edit file's contents or use Inspect File Record command to edit file's record. You may use context menu for same result.
Tip: You can use the Ctrl+H shortcut to open any selected item in Disk Editor.
Disk Editor allows you to edit a file in several view modes:
File presented as raw data in context of physical data storage (disk)
File presented as data on parent logical structure - partition or volume (logical drive )
Single file — seamless ray file contents.
File editing is the same as with any other editable object in Disk Editor. Read Working with editor on page 89 for more information.
Warning: For safety reason, by default all objects are opened in Disk Editor as Read Only to prevent accidental modifications. In Edit mode, you can change content of the opened file or disk and all modifications are stored in memory. Changes are written to the drive when you click Save.
Warning: As with any advanced tool, use extreme caution with the Disk Editor. Changes that you make may affect disk structure integrity. You must be certain that the changes you make are in line with correct data structures before you save changes.
Information about file in File Table could be viewed for file by doing one of the following:
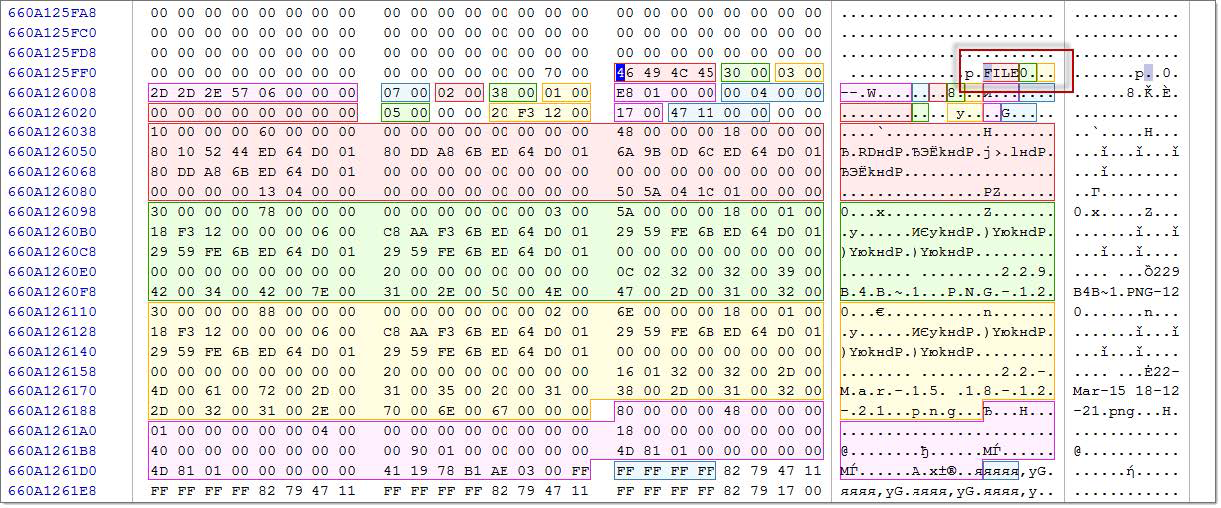
Figure 38: File record on NTFS
Use data templates to inspect file record. Depending on file system, they can be named as file record templates, directory entries or superblocks.
To open the File Cluster Chain View:
Go to selected cluster of cluster chain. Same effect can by achieved by double-clicking on cluster entry in cluster chain list.
Go to Previous: go to previous cluster chain in sequence.
Go to Next: go to next cluster chain in sequence.
After you have opened an object with the Disk Editor, you may navigate by scrolling block by block, or by jumping directly to specific addresses. You may jump to disk system records such as the boot sector (primary and copy) or a partition table.
Use the Navigate button in the toolbar to jump to a specific area in the open object.
When you navigate to an access point through the Navigate menu or jump to a specific offset or sector, those addresses are stored in a stack. You can move backward and forward to the previous locations by using the Back and Forward commands located in the Disk Editor Toolbar.
The selections that appear depend on the type of object that you are editing.
No matter what object is opened for editing, the first two menu items in the Navigate menu will be Go to Offset and Go to Sector.
After you have opened an object with Hex Editor, you may navigate by scrolling block by block, or by “jumping” directly to specific addresses. You may jump to disk system records, such as the boot sector (primary and copy) or partition table. In a file’s cluster chain list, you may jump to the first cluster of a continuous cluster chunk when working with a file.
The selections that appear depend on the type of object that you are editing
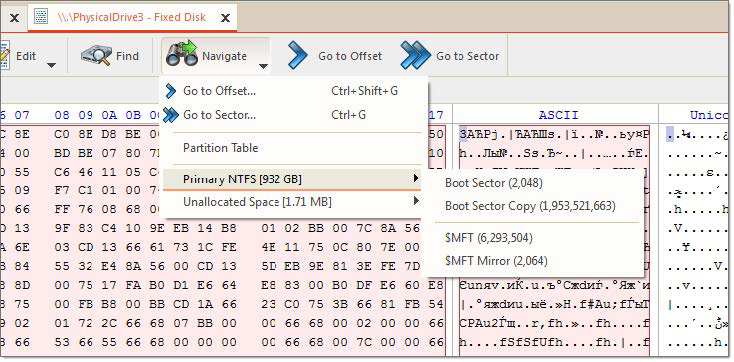
Figure 39: Example. Navigate Menu Selections
The Go to Offset menu opens a dialog allowing specification of an exact location (offset) in the disk to jump to.
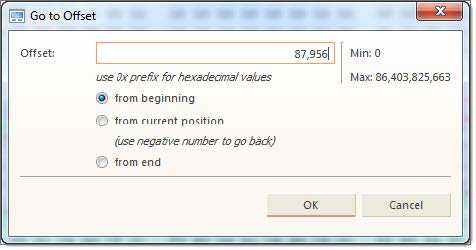
Figure 40: Go to Offset dialog
You can use both decimal and hexadecimal values, preceding hexadecimal values with 0x. For example, to specify location 512 as a hexadecimal number, enter 0x200. There are also options to specify an offset from the beginning, from the current position, or from the end.
Next to the offset edit field there are two labels specifying the minimum and maximum allowed vales for offsets displayed as decimal numbers.
You can also open this dialog directly by using the shortcut Ctrl+Shift+G.
This command allows jumping to the beginning of a specified sector or cluster.
There are two edit fields in this dialog that allow entering a desired location either as a sector number or a cluster number.
The Cluster edit field is available only for logical disks and greyed out for all other objects.
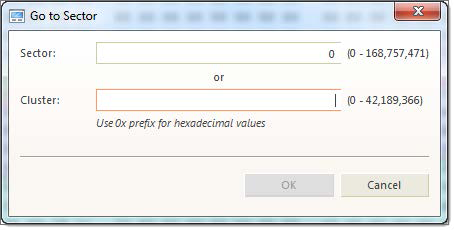
Figure 41: Go to Sector dialog
As with the offset dialog, you can also use both decimal and hexadecimal numbers.
Next to the edit field is the range of allowed values in brackets. Notice that not all sectors correspond to clusters, but every cluster corresponds to a particular sector.
You can enter either a sector value or a cluster value. Depending on which field is active, the dialog will use a sector or cluster. If you enter a number in the cluster edit field, a corresponding sector is displayed automatically. You can also open this dialog directly using the shortcut Ctrl+G.
To navigate to the disk system records of a physical disk, click on the Navigate button in the toolbar. Depending on the partition scheme and contents of the physical disk you are editing, the Navigate menu will contain different options.
Figure 42: Example. Navigate Menu Selections
After the Go to Offset and Go to Sector items there is a Partition Table menu item which allows jumping to sector 0 of a physical disk. As you jump to the partition table, a Master Boot Record template is automatically selected. If the disk is not empty, the names of the partitions and their system areas will be in sub menus below the Partition Table menu item.
For dynamic disks the following system areas are available for direct access:
After each access point a sector number is specified in the brackets.
To navigate to the disk system records of a logical drive, click on the Navigate button in the toolbar. Depending on the file system present in a logical drive, the navigation menu will have different access points.
Some of the access points when used automatically select a corresponding template. For example, if a boot sector access point is selected, a boot sector template is applied to the boot sector offset.
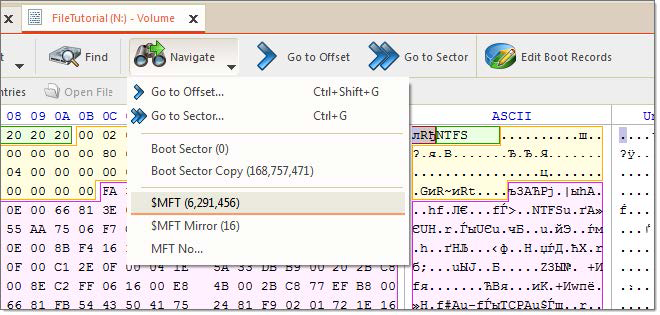
Figure 43: Example. Navigate Menu Selections
When editing volume (logical drive) you also can navigate file records. To activate this feature toggle on Browse File Entries button in toolbar. By selecting file or folder in file's tree editor's pane will automatically repositions to beginning of file entry record. If recognised, file can be previewed in File Preview pane and Property pane will display file's most common attributes and properties.
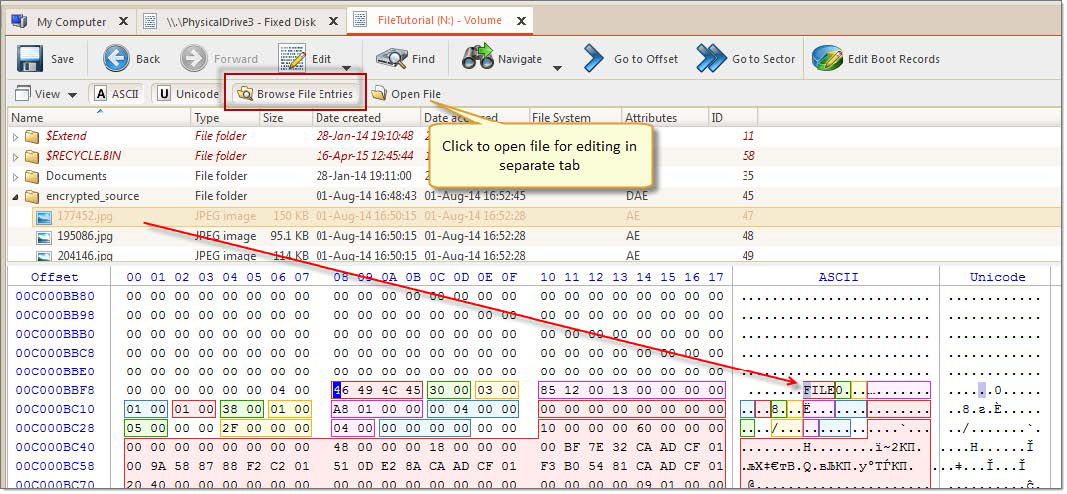
Figure 44: Browsing volume file entries
To open selected file in separate Disk Editor either click Open File button in toolbar or Double click on selected file for the same result.
You can fill a selection with an arbitrary text or binary data. Make a selection first, then right click Edit > Fill block.
The Fill Block dialog allows entering either text or hex value patterns which will be used to fill the selection. Patterns are used in a loop until the whole selection is filled. For example, if you need to fill a selection with 0 bytes, just enter 00 into the Hex values edit field. If you want fill it with an 'ERASED' pattern, enter it as a text and it will be repeated as many times as necessary to fill the block.
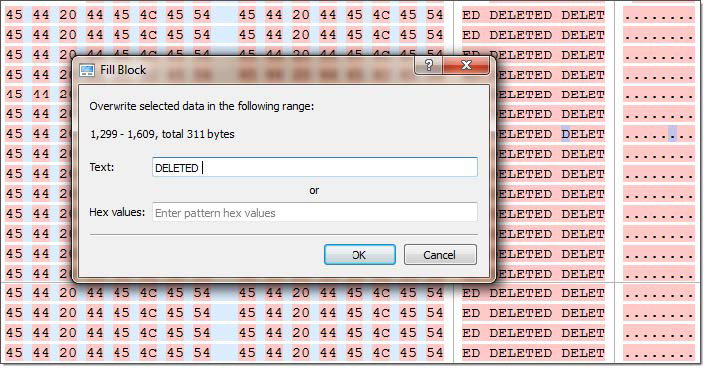
Figure 45: Fill Block dialog
Primary Boot Sector and Copy Boot Sector (if applicable) can be edited and synchronized by individual fields.
Active@ UNDELETE provide "suggested" boot sector with most appropriate values for reference.
1. Select logical drive (partition)
In Partition Manager or Recovery Explorer select a logical drive (partition) node.
2. Open the Edit Boot Sectors dialog
3. Edit boot sectors
Use radio buttons near the value fields to select and click OK button to confirm changes.
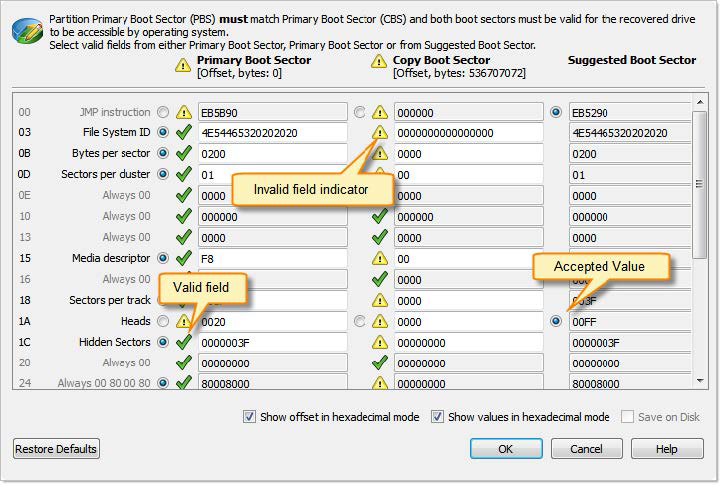
Figure 46: Synchronize Boot sectors dialog box
4. Click OK to complete changes